The new Microsoft operating system - Windows 7 is awarded with the word "impressive" by the masses, but it still gets complaints from early adopters on the web. Having spent couples of days in forums and communities full of discussion about Windows 7, I find that Windows 7 can easily slow down due to various issues just as its predecessors, Windows XP or Vista.
Well, there is no rose without a thorn. For enjoying the non-compromised features of Windows 7 and keeping its freshness as long as possible, you can take the following top 9 tips to speed up Windows 7 performance, and save your time, money as well as get full control of your PC!
Tip 1 to speed up Windows 7 performance: Cleanup Hard Disk
Windows temporary files, internet cache, cookies, invalid shortcuts and unused files and programs can take up much room on your hard disks. Even you have just upgraded to Windows 7, those junk files can soon accumulate and eat up hard disk space. So regular disk cleanup should be part of your daily work to keep Windows 7 running fast.
Windows 7, as its predecessors, has a built-in Disk Cleanup program, you can find it in Start>Accessaries>System Tools>Disk Cleanup. But this built-in tool takes quite a long time to scan your hard disk and is able to clean very limited junk files. So a third-party disk cleaner is recommended to use to save your time and perform a more complete disk cleaning job.
Tip 2 to speed up Windows 7 performance: Boost Windows 7 Boot Speed
The more programs run automatically when you start your computer, the slower your PC boot. Often when you install a program, it will ask you whether it should start as soon as you boot up your computer, but some malicious programs simply add themselves to that auto-start folder without your permission.
Open Run, input “msconfig”, then select “Boot”, you will see a list of programs in that auto-start folder. You can manage them there.
Tip 3 to speed up Windows 7 performance: Defrag Hard Disk
Your hard drive can be full of fragmentation with time, which dramatically slows down Windows running. Microsoft OS including Windows 7 provides the built-in Disk Defragmenter tool, which lets you remove empty patches, pack pieces of files together, and thus occupy contiguous storage locations, increase the speed of reading and writing files to/from hard disk.
Frequency: Disk defragmentation should be performed every two or three months, because frequent disk defragmentation can decrease the span of hard disk.
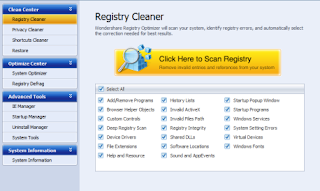
Tip 4 to speed up Windows 7 performance: Scan & Repair Registry
Registry is the central database of Windows which stores the necessary information and settings for software and hardware running smoothly. Even you have uninstalled a program, respective information is saved there. Windows registry can be full of errors that cause the main system crashes, error messages, freezes and slowdown. You will be amazed when you view how many errors exist in your registry.
Microsoft experts never suggest people to manually change their registry, since any improper operation to registry can cause serious damage. Instead of taking that risk, using a third-party safe registry cleaner/optimizer might be better. Here is a free registry cleaner review for your reference.
Tip 5 to speed up Windows 7 performance: Defragment Windows 7 Registry
Just like hard drive needs defrag, registry needs too. Registry defrag is to remove fragmentations and creates a linear registry, which can speed up registry access and program response. Some defrag programs also compact your registry to a smaller size, thus it can take up less memory and make room for other programs running fast. There is a free registry defrag software which can safely defrag registry in two minutes for most Windows systems.
Tip 6 to speed up Windows 7 performance: Uninstall Unused Programs
Uninstalling programs that you seldom use is better than just removing them from your hard drive., because simple deletion can cause Windows errors. Some programs have the built-in uninstall app while others don't. Then you can go to the control panel and uninstall them. For those malicious programs that don’t allow you to uninstall, you can make use of a third-party uninstall manager (known as built in Wondershare Registry Optimizer) to get rid of them.
Note: cleanup registry is necessary after the uninstallation. Detail is given in the following part.
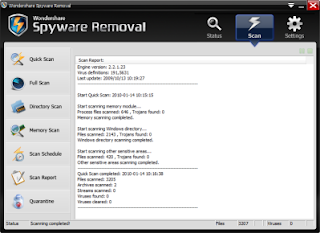
Tip 7 to speed up Windows 7 performance: Update Anti-Spyware Program
Use an antivirus program to protect your computer from the attacks of spyware, virus, trojan and other malware, and regularly update the program. If your spyware removal or anti-virus software offers an automatic update option, then it's good. If not, you'd better update them manually.
Since there are many types and variations of viruses, spyware that can infect your computer and revise your system settings, regular update to ensure that you have the latest threat signatures and regular scan to secure your computer.
By the way, Wondershare Spyware Removal is now free for six months, that you can get the free registration code as soon as you submit your email address. With this registration code you can update & get technical support without limitation for 6 months, after that you can renew it with 50% off.
Tip 8 to speed up Windows 7 performance: Boost Performance by Adjusting Registry Parameters
This step is to change registry parameters designed to boost Windows 7 system performance, such as automatically end hung applications, optimize internet connection, speed up loading web pages, speed up Windows shutdown, etc.
There are many online tips talking about how to manually revise registry settings for better system performance, but manual revisement fits more for computer expert than for beginners. Beginners has better use a system optimizing utility (known as built in Wondershare Registry Optimizer) to have this done in single 1 mouse click.
Tip 9 to speed up Windows 7 performance: Turn off Part of Win7 Graphics
Windows 7 has been added many eye candy visual effects, which are recourse hog, especially when, what you expect from Windows 7 is more performance. So you can disable some unwanted visual effects of Windows 7 to enjoy the maxim of Windows 7 speed and performance.
To disable unwanted visual effects: Right click on "Computer" and select "Properties" from the context menu, click "Advanced System Settings", then under "Performance" click "Settings". Choose the "Custom:" option. Then you can select which effects to keep and which to disable. Actually you are recommended to untick all the options, and select only the last four options to apply.
Sunday, January 31, 2010
Monday, January 25, 2010
Four Steps to Make Your New PC Hassle-Free
Part 1: Create a System-Repair Disc
Did Santa bring you a new PC this year? That's great! You must have been a good little user.
While I'm sure you're eager to start using the new system, it's worth taking a little time to "hassle-proof" it first. Step one: Create a system repair disc.
See, you never know when some catastrophe will strike your PC, rendering it unable to boot. And because few vendors these days bundle actual operating-system discs, it's up to you to build a bootable CD or DVD that can help save the day.
Thankfully, Windows 7 makes this quite easy. Just click Start, type repair, and then click Create a System Repair Disc. Pop a blank CD or DVD into your drive (netbook users will need to connect an external one), click Create disc, and then sit back while Windows gets to work.
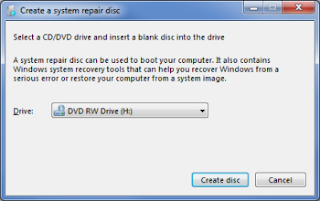
When it's done, label the disc, file it away, and hope you never need it. If you do, you can boot the disc to load a basic repair environment with diagnostic tools and System Restore.
The important thing to remember is that you can't do this after a problem has occurred; you need to create your repair disc ahead of time. So take 10 minutes and do it right now. At some point in the future, you may be awfully glad you did.
Part 2: Remove the Crapware
Now that you've created a system-repair disc for your new PC, let's get it running at peak performance. That means removing some, if not all, of the software that was preloaded by the system maker. Some call it shovelware; I call it crapware.
Why the derogatory moniker? Simple: The proprietary and/or third-party software that many vendors preload on their PCs is mostly junk. It consumes space on your hard drive, causes your system to boot slower than it should, and just generally gets in the way.
Yes, I'm looking at you, McAfee Internet Security 90-day trial. And Google Desktop. And Roxio everything. You're not bad products, but I didn't ask for you, and I don't want you unless I want you. Get it?
Uninstall crapware but worry that there may be shatters remaining here and there, say, in the registry? Well, this worry is not groundless. Some invalid keys do stay in the registry after installation. And in this case you can use registry optimizer software to clean them.
Part 3: Keep It Secure
Now let's talk security. As any regular people know, computers and their users are vulnerable to all manner of threats, from hackers to spyware to viruses. That's why it's critical that you batten down your new machine's hatches right from the get-go.
Psst! Guess what? Right out of the box, Windows 7 is already pretty darn secure. And there are many security utilities available online to choose, trojan, adware and free spyware removal, etc.
Meanwhile, the latest versions of Firefox (3.5) and Internet Explorer (8) help keep you safe from pop-ups, phishing attempts, browser hijacking, and the like.
As for e-mail, both Gmail and Yahoo employ Norton anti-virus software at the server level (meaning there's nothing you have to install), along with anti-spam and anti-phishing tools. If you happen to use either one, well, you've got clean mail.
There are a couple tools of your own to consider adding to the mix. The first is a router, which has a built-in firewall that effectively renders your PC(s) invisible to the Internet at large--so no hackers will be able to break in.
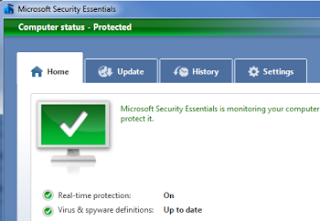
Second, for that little bit of extra protection, install Microsoft's widely acclaimed Security Essentials antivirus software.
Part 4: Create a Drive Image
Now that you've created a system-repair disc, dumped the junkware, and taken steps to secure your new PC, it's time to perform what I consider to be the ultimate hassle-prevention step: imaging (a.k.a. cloning or backup your hard drive).
See, right now your system is exactly the way you want it. You've got a fresh install of Windows (one that's newly free of crapware), the latest versions of your favorite apps (which I'm assuming you've already loaded), and all the security tools you need.
Wouldn't it be great to take a "snapshot" of this setup that you can restore in the event of catastrophe (or merely the inevitable slowing of Windows over time)? That's the idea behind creating a drive image: It can restore your PC to a like-new but custom-configured state.
You may never actually need the image file--but if you do, you'll be awfully glad you have it, for no one can guarantee that he/she will never come across a system crash or an impossible-to-remove virus.
Traditionally, software you use to backup your drive just packs and compresses all your data in certain format of file which usually takes one third to half as large size as original data. That means if you want to image 10 GB data on your drive C, you will have to spare another 3 to 5 GB for the backup file. And procedures of backup and performing restore can be very complicated and time costing. Here I’m telling you that there is a tool called Time Shuttle that it can image your drives without any space taken, and create images and perform restore both in seconds. Yes, don’t doubt it, and it just can do that!
After you finish the four steps, it’s not exaggerated to say your computer is hassle-free. Now go forth and enjoy that new PC! And let me know if you run into any other hassles that need solving.
Did Santa bring you a new PC this year? That's great! You must have been a good little user.
While I'm sure you're eager to start using the new system, it's worth taking a little time to "hassle-proof" it first. Step one: Create a system repair disc.
See, you never know when some catastrophe will strike your PC, rendering it unable to boot. And because few vendors these days bundle actual operating-system discs, it's up to you to build a bootable CD or DVD that can help save the day.
Thankfully, Windows 7 makes this quite easy. Just click Start, type repair, and then click Create a System Repair Disc. Pop a blank CD or DVD into your drive (netbook users will need to connect an external one), click Create disc, and then sit back while Windows gets to work.

When it's done, label the disc, file it away, and hope you never need it. If you do, you can boot the disc to load a basic repair environment with diagnostic tools and System Restore.
The important thing to remember is that you can't do this after a problem has occurred; you need to create your repair disc ahead of time. So take 10 minutes and do it right now. At some point in the future, you may be awfully glad you did.
Part 2: Remove the Crapware
Now that you've created a system-repair disc for your new PC, let's get it running at peak performance. That means removing some, if not all, of the software that was preloaded by the system maker. Some call it shovelware; I call it crapware.
Why the derogatory moniker? Simple: The proprietary and/or third-party software that many vendors preload on their PCs is mostly junk. It consumes space on your hard drive, causes your system to boot slower than it should, and just generally gets in the way.
Yes, I'm looking at you, McAfee Internet Security 90-day trial. And Google Desktop. And Roxio everything. You're not bad products, but I didn't ask for you, and I don't want you unless I want you. Get it?
Uninstall crapware but worry that there may be shatters remaining here and there, say, in the registry? Well, this worry is not groundless. Some invalid keys do stay in the registry after installation. And in this case you can use registry optimizer software to clean them.

Part 3: Keep It Secure
Now let's talk security. As any regular people know, computers and their users are vulnerable to all manner of threats, from hackers to spyware to viruses. That's why it's critical that you batten down your new machine's hatches right from the get-go.
Psst! Guess what? Right out of the box, Windows 7 is already pretty darn secure. And there are many security utilities available online to choose, trojan, adware and free spyware removal, etc.

Meanwhile, the latest versions of Firefox (3.5) and Internet Explorer (8) help keep you safe from pop-ups, phishing attempts, browser hijacking, and the like.
As for e-mail, both Gmail and Yahoo employ Norton anti-virus software at the server level (meaning there's nothing you have to install), along with anti-spam and anti-phishing tools. If you happen to use either one, well, you've got clean mail.
There are a couple tools of your own to consider adding to the mix. The first is a router, which has a built-in firewall that effectively renders your PC(s) invisible to the Internet at large--so no hackers will be able to break in.
Second, for that little bit of extra protection, install Microsoft's widely acclaimed Security Essentials antivirus software.

Part 4: Create a Drive Image
Now that you've created a system-repair disc, dumped the junkware, and taken steps to secure your new PC, it's time to perform what I consider to be the ultimate hassle-prevention step: imaging (a.k.a. cloning or backup your hard drive).
See, right now your system is exactly the way you want it. You've got a fresh install of Windows (one that's newly free of crapware), the latest versions of your favorite apps (which I'm assuming you've already loaded), and all the security tools you need.
Wouldn't it be great to take a "snapshot" of this setup that you can restore in the event of catastrophe (or merely the inevitable slowing of Windows over time)? That's the idea behind creating a drive image: It can restore your PC to a like-new but custom-configured state.
You may never actually need the image file--but if you do, you'll be awfully glad you have it, for no one can guarantee that he/she will never come across a system crash or an impossible-to-remove virus.
Traditionally, software you use to backup your drive just packs and compresses all your data in certain format of file which usually takes one third to half as large size as original data. That means if you want to image 10 GB data on your drive C, you will have to spare another 3 to 5 GB for the backup file. And procedures of backup and performing restore can be very complicated and time costing. Here I’m telling you that there is a tool called Time Shuttle that it can image your drives without any space taken, and create images and perform restore both in seconds. Yes, don’t doubt it, and it just can do that!

After you finish the four steps, it’s not exaggerated to say your computer is hassle-free. Now go forth and enjoy that new PC! And let me know if you run into any other hassles that need solving.
Tuesday, January 12, 2010
Best Way to Recover Files
When we talk about file recovery, generally we mean using software to recover files. Before we go to find the best way, let’s figure out why deleted or lost files can be recovered and how. To make theoretical and full understanding of files recovery, we will have to introduce the data structure and storage theory on hard drives from basics, and that’s too complicated, so let’s explain it in a popular way.
A file on drive may be not stored in a whole lump; it’s distributed in some small pieces and connected by something like a chain. To visit the file, we only need to find the head of the chain. When we delete the file, actually we just delete the head of the chain. We can’t see the file any more via our operating system if without the head.But in fact, the rest and main part of the file is still where it is. Though when deleting the file, we can find that the space it takes is released while actually it isn’t. It just like it announces that the place is free for others to occupy. Only when this space is overwritten by other files is the previous file really deleted, erased and gone. This is the very point that recovery software makes use of to recover files. It just adds a new head for the remaining part of the file and let you see it again through operating system.So if you delete a file on a drive, as long as your later operations on this drive don’t take the place of that file, you can recover it through software. But if unfortunately they do, then just say farewell to the file. One thing is certain that if you cover a file with another that is with the same name, the previous one is sure to be deleted forever, unrecoverable.
In fact, the rest part of a file takes most space but if without the head, it’s meaningless.
Now we know how file recovery software works, and smart as you must be aware that you cannot guarantee 100% file recovery through software, at least not currently. How can you be sure that you haven’t taken any operation on a drive where you deleted a file earlier and want to recover it?
The way above can save some emergency, but there is too much randomicity involved. So next we are going to talk about a method that can guarantee 100% file recovery.
Here we use a program called Wondershare Time Shuttle. One of its features can perfectly realize 100% file recovery.
The principle of Time Shuttle is kind of like protection. All data on Time Shuttle involved drives are well protected and the rest part of a file we mentioned above is also kept not to let others to occupy. Thus no matter what you have done on the drive after you delete a file on it, you can easily get it back, no need to worry whether its place have been overwritten. Even if you cover a file with another file with the same name, you can get the old version back!
And this is merely one feature of Time Shuttle. There are still more it has. Download it and it will bring you great pleasant surprise!
Monday, January 11, 2010
Three Ways to Restore System
For most computer users system restore may not be unfamiliar, and quite a lot of people take it as the last straw when attempts to remove a stubborn virus and stop sustained blue screen, etc., fail. It’s much better than reinstalling system, for the latter method erases all private data on your system partition, while the former one saves some.
System restore is used as the last resort. Only when there is no way else to remove problems do people use it, for common ways of restore are still far from satisfactory. It’s not guaranteed that all data you want can be kept after restore, and backup files for restore kept on your disk can take large space, and besides, it’s also a reason that operation of performing restore can be really complicated.
First of all, let's have a look at the table below.
(Why is there a large space of blank? I just can't fix it. The table is far below, sorry.)Windows | Ghost | ||
Snapshot | 1000 | Depends | Depends |
Snapshot | 0 | Up | Example: |
Snapshot | yes | yes | |
Restore | 20 | reboot | Depends |
Individual | yes | yes | |
Fail | yes | yes | |
Disk | yes | ||
Schedule | yes | yes | |
multi-user | yes | ||
Snapshot | yes | yes |
There are two main ways that people usually use to restore system, the Windows System Restore and Ghost.
Windows System Restore
- Windows attached program, every Windows user can use it. Operating difficulty: medium
- Space consuming: 12% of partition space by default
- Backup type: system related files backup
Windows System Restore comes along with the operating system. You can click Start-Programs-Accessories-System Tools-System Restore to reach it. Different Windows versions may differ. It only backups system-related files in the restore points and the points can be kept at most 90 days. Personal files like documents, pictures and other installed programs are not protected. Windows System Restore will take at most 12% of drive space by default. You can create restore points manually, and it will create automatically when you install certain programs or drivers. Restore points will be deleted automatically when the using space limit is reached. The shortage is that it’s a little bit space consuming, and when system crashes, sometimes it’s no way to perform restore.
Here to learn more about Windows System Restore.
Ghost
- Operating difficulty: relatively high
- Space consuming: depends on data size backed up
- Backup type: in disk sector units
It is software that makes backups in the form of compressed archives. The archives contain complete data of the protected partition. You can keep the backup files permanently and even use the backup files to create a complete copy of data on other computers, and this is one thing that other ways of restore cannot match. As long as you have a backup, you can restore system no matter whether your system can be started. You won’t lose any data or files that existed when the backup was made. The size of backups depends. Usually a backup for a partition that has 8 to 10 GB data may take about 2 GB space.
One point of inconvenience is that Ghost is not quite easy to use. You should go to the booting menu to operate before logging in Windows. Besides, you may feel bothered to make backup files due to the complicated operation, so your backups may always lack new added files on your disks. Not long ago some virus came out. They sabotage the system and at the same time, they seek and delete .GHO files, the backup files made by Ghost, making it impossible to restore system to remove virus via Ghost.
Pay attention that Ghost makes backup files in disk sector units, which means that it backups complete data on a certain partition. When restoring, it proceeds also in sector units, which means current data on target partition will be erased completely and covered by data in the backup file. You cannot undo this course.
Here to learn more about Ghost.
Besides the two traditional ways, there is a third choice. There is something new in this way.
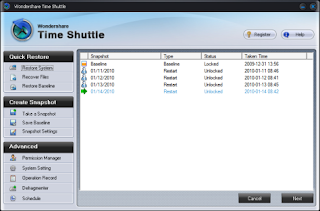
Time Shuttle
- Operating difficulty: easy
- Space consuming: snapshots not take space; up to 1,000 snapshots
- Backup type: disk sector in units; support individual file recovery
Compared with traditional ways of restoring, this one, Time Shuttle, features in its speediness, convenience, multi-point restore and individual file recovery.
With simple operations, you can create a snapshot within 5 second, no need to reboot your computer. The snapshot just remembers the current status of your hard drive and it doesn’t copy data as backup. Thus snapshots of Time Shuttle do not take any space themselves. When something goes wrong with your computer, snapshots can take your system back to what they have remembered. This restore process is simple, too. You just need 20 seconds and a reboot, and then all is done. You can create up to 1,000 snapshots, which means you can remember 1,000 statuses of your computer, and this is the true meaning of Time Shuttle. You can jump freely between snapshots you have created. Not satisfied with the system after a restore? Never mind, just jump back or to another one. The convenience and plurality let you create snapshots whenever you like and therefore you can always keep your recent added files and data remembered. You can also set automatic tasks to create snapshots on every computer booting, every day and every week, etc.
Another highlight of Time Shuttle is that it can recover individual files. Time Shuttle creates snapshots and restore in sector units, too. But unlike Ghost, it can recover individual files from a snapshot without restoring the whole data on a partition. A better point is that individual file recovery is as easy as copying and pasting files, also no need to reboot computer.
Time Shuttle also considers the situation that Windows cannot start. There is a booting menu and you can press Home key to enter it before logging in to the desktop, and then perform system restore. Thus even your system is too damaged to start, you are still able to use Time Shuttle to bring it back to normal.
Here to learn more about Time Shuttle.
The three ways each have their own advantages. Using restore well can help your build up the last defense of your computer. And as new technology is developed, it becomes more and more convenient to use system restore, and it may be primary way to remove computer problems.
Monday, January 4, 2010
How to Make Your Windows 7 Security Attain a Yet Higher Level
Compared with old operating systems, we can well say Windows 7 security is much higher. It, however, doesn’t mean you have nothing to worry about, for quite a few security functions of Windows 7 are disabled or not properly set by default. We should enable these functions and configure properly to make them do as they can. In that way, the Windows 7 security can attain a yet higher level.
- Make good use of BitLocker to protect your privacy on disks
As removable media become more and more popular, it has been a most concerned issue of protecting data on them. To meet security demand mobile storage device encryption is added to Windows 7----new BitLocker, actually. The old BitLocker only functions on systemic disk, and it’s hard to go through the settings process. Windows 7, on the other hand, has overcome the shortcoming. We can easily set BitLocker on Windows 7 to encrypt USB and flash memory devices. Even if we lost our mobile storage devices some day, we don’t need to worry about privacy data disclosure.
To turn on BitLocker on Windows 7, we can click Start, click Control Panel, click System and Security, and then click BitLocker Drive Encryption to enter drive list.
Select drives you want to protect and click Turn On BitLocker and set decryption key. From then on the drive is encrypted and decryption key is needed to access the drive. If without the key, then no one can peek the data and privacy within.
- Make good use of antivirus software to guarantee Windows 7 security
Microsoft provides free antivirus software MSE, but it’s not come with Windows 7 when the system is installed. You have to download it from Microsoft’s website. Though MSE as comprehensive antivirus software has just come to the forefront not for long and it’s challenged by many other sophisticated products, one fact lies here that no one else can know more about Windows 7 and Windows 7 security as well. This one plus its free policy make it more competitive. Equipping with antivirus is a most important step in computer security protection.
As the computer technology develops rapidly, various threats come along as well. Stubborn trojan, spyware and other malware make traditional antivirus software no longer enough. And then relevant solutions come into being. Like we have free and charged antivirus to choose, there are also charged special security utilities as well as free spyware removal, trojan removal and a series malware removal software. Choose the right one, the free can do as well as the charged, too, if not better than.
- Make good use of software restriction policies to avoid vulnerabilities being abused
I believe many users download patches to fix vulnerabilities regularly via Automatic Updates to avoid system vulnerabilities being used by hackers, and this is good habit. However, only Windows vulnerabilities can be fixed in this way but other software’s is left unfixed. To prevent software vulnerabilities from being abused we can make clever configuration on Windows 7 software restriction policies to restrict software containing bugs to network connection so that they won’t be used by hackers via network. Follow the steps to make restrictions.
Click Start, Run, and type gpedit.msc to enter Group Policy window.
Then unfold Computer Configuration/Windows Settings/Security Settings/Software Restriction Policies. Right click Software Restriction Policies and click Create New Policies. Next double click Enforcement in the right windows and check All users except local administrators under Apply software restriction policies to the following users, apply and confirm.
After that right click Additional Rules at the same window as Enforcement, and choose New Path Rule. Browse and add applications that contain bugs, and shift Security to Disallowed. Finally, software vulnerabilities can’t be used to attack our Windows 7 by hackers any more.
- Make good use of UAC to raise Windows 7 security level
UAC is not newborn thing on Windows 7, but compared with what are on Vista and Windows 2008, it has been improved much on the new system. It’s far smarter in distinguishing illegal and legal operations now, and we can set its security level freely according to our actual need, ensuring working efficiency and security both to the largest extent.
We recommend UAC is set at Always notify to ensure a steady system. And as is said above UAC on Windows 7 is smarter; even if it’s at Always notify it alerts much less than Vista.
- Make good use of SmartScreen Filter to defend malicious web attack
Nowadays quite a few websites have malicious controls and virus code hidden behind. Once you visit these sites and you will be attacked by the controls and codes, leading to virus infection, or local drives formatted. To prevent this, the new IE browser on Windows 7 has SmartScreen Filter added. When it is enabled, the local IE browser will be connected to Microsoft’s website data base in order to verify whether the target site you want to visit is safe or not, and thus the possibility of being attacked is reduced to the least. To enable SmartScreen Filter, you can click tools on IE, choose SmartScreen Filter from the pull-down menu and open it in the sub menu.
Later when you visit websites that contain malicious factors or disguise as normal sites SmartScreen is going to give alerts to us.
Subscribe to:
Posts (Atom)
